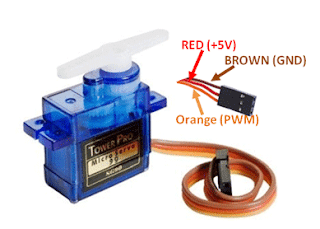
Servo Motor
Motor Servo SG90
https://drive.google.com/file/d/14kJyfZML-zmrB64Ey-2aAGQa8reawmwV/view?usp=sharing
Penerapan cara kerja servo pada lengan robot:
https://drive.google.com/file/d/1a8snOgoBHDjM884RCN4LJkA3JhHMYJHV/view?usp=sharing
Penerapan cara kerja servo pada lengan robot di industri Mobil Tesla:
Contoh Penggunaan Script Servo Motor pada ESP8266 NodeMCU :
/*******************
WiFi Robot Servo - SG90
Minimum for:
- AccessPoint AP
- WebServer
- OTA
iot2 - fajar himawan
********************/
#include <ESP8266WiFi.h>
#include <ESP8266WebServer.h>
#include <ArduinoOTA.h>
#include <Servo.h>
Servo myservo;
int sudut1= 0;
int sudut2= 180;
const int wifiLedPin = D0; // set digital pin D0 as indication, the LED turn on if NodeMCU connected to WiFi as STA mode
ESP8266WebServer server(80); // Create a webserver object that listens for HTTP request on port 80
unsigned long previousMillis = 0;
String sta_ssid = "ota"; // set Wifi networks you want to connect to
String sta_password = "12345678"; // set password for Wifi networks
void setup(){
myservo.attach(D4);
Serial.begin(115200); // set up Serial library at 115200 bps
Serial.println();
Serial.println("*WiFi Robot Remote Control Mode - L298N 2A*");
Serial.println("------------------------------------------------");
pinMode(wifiLedPin, OUTPUT); // sets the Wifi LED pin as an Output
digitalWrite(wifiLedPin, HIGH);
// set NodeMCU Wifi hostname based on chip mac address
String chip_id = String(ESP.getChipId(), HEX);
int i = chip_id.length()-4;
chip_id = chip_id.substring(i);
chip_id = "IOT-" + chip_id;
String hostname(chip_id);
Serial.println();
Serial.println("Hostname: "+hostname);
// first, set NodeMCU as STA mode to connect with a Wifi network
WiFi.mode(WIFI_STA);
WiFi.begin(sta_ssid.c_str(), sta_password.c_str());
Serial.println("");
Serial.print("Connecting to: ");
Serial.println(sta_ssid);
Serial.print("Password: ");
Serial.println(sta_password);
// try to connect with Wifi network about 1 seconds
unsigned long currentMillis = millis();
previousMillis = currentMillis;
while (WiFi.status() != WL_CONNECTED && currentMillis - previousMillis <= 1500) {
delay(500);
Serial.print(".");
currentMillis = millis();
}
// if failed to connect with Wifi network set NodeMCU as AP mode
if (WiFi.status() == WL_CONNECTED) {
Serial.println("");
Serial.println("*WiFi-STA-Mode*");
Serial.print("IP: ");
Serial.println(WiFi.localIP());
digitalWrite(wifiLedPin, LOW); // Wifi LED on when connected to Wifi as STA mode
delay(3000);
} else {
WiFi.mode(WIFI_AP);
WiFi.softAP(hostname.c_str());
IPAddress myIP = WiFi.softAPIP();
Serial.println("");
Serial.println("WiFi failed connected to " + sta_ssid);
Serial.println("");
Serial.println("*WiFi-AP-Mode*");
Serial.print("AP IP address: ");
Serial.println(myIP);
digitalWrite(wifiLedPin, HIGH); // Wifi LED off when status as AP mode
delay(1000);
}
server.on ( "/", HTTP_handleRoot ); // call the 'handleRoot' function when a client requests URI "/"
server.onNotFound ( HTTP_handleRoot ); // when a client requests an unknown URI (i.e. something other than "/"), call function "handleNotFound"
server.begin(); // actually start the server
ArduinoOTA.begin(); // enable to receive update/uploade firmware via Wifi OTA
}
void loop() {
ArduinoOTA.handle(); // listen for update OTA request from clients
server.handleClient(); // listen for HTTP requests from clients
delay (500);
myservo.write(sudut1);
delay (500);
myservo.write(sudut2);
}
// function prototypes for HTTP handlers
void HTTP_handleRoot(void){
server.send ( 200, "text/html", "" ); // Send HTTP status 200 (Ok) and send some text to the browser/client
if( server.hasArg("State") ){
Serial.println(server.arg("State"));
}
}
void handleNotFound(){
server.send(404, "text/plain", "404: Not found"); // Send HTTP status 404 (Not Found) when there's no handler for the URI in the request
}
____________________________
Script tersebut bisa kita upload menggunakan Aplikasi Aduinodroid tanpa kabel / wireless, cukup hanya dengan koneksi wifi di smartphone kita, klik: https://play.google.com/store/apps/details?id=name.antonsmirnov.android.arduinodroid2
Skema Rangkaian:
Kabel Kuning = D4
Kabel Merah = 3 V
Kabel Hitam = G


No comments