Kabar Terkini

Membuat Drone ESP8266 (Mampu Terbang dan Merayap)


 Make ESP8266 Drone

(This Drone Can Climb on Wall)


This Blog I’m going to tell you how I made ESP8266 Drone (This Drone Can Climb on Wall) and how it works ?

You know what is the function of a drone, just can fly if I tell you that my drone can climb on wall or go underwater like a submarine, You would think that this is making you crazy, so let’s not go, today we will show you by making it.

For a drone we need a flight controller but we don’t have much money for flight clontroller So don’t worry already made my own flight controller if you haven’t seen my earlier project then go and see I have made a very cheap flight controller using ESP8266 in it I have given the link below.

ESP8266 Drone Guide

Thank You NextPCB

This project is successfully completed because Help from NextPCB. Guys if you have a PCB project, please visit their website and get exciting discounts and coupons.

Only 0$ for 10pcs 1-4 layer PCBshttps://www.nextpcb.com/pcb-quote

Sign up and get 100$ coupon: https://www.nextpcb.com/pcb-quote?act

So here, I am sharing step by step build instruction of my ESP8266 based Drone.

Supplies For Esp8266 Drone

Table of Contents

Components Required (let’s have a look at the main components of a drone)

If you are electronics hobbyist than you will find All parts listed below in your inventory -:)

Tools Used: 

A drone will consist of frame, motors, propellers, electric motor, flight controller, battery, Here is a short summary of each  parts of a quadcopter.

Flight Controller:

The flight controller (a.k.a FC) is the brain of the aircraft. it’s a circuit board with a range of sensors that detect movement of the drone, as well as user commands. If you tell it to go forward, the flight controller will adjust the RPM of the rear motors so that it goes forward.

ESP8266 Module

To communicate with the drone we will need bluetooth or wifi connection so we are using Esp8266 Wi-Fi module because it has inbuilt Wi-Fi, we can use it for communicate. Talking about range of the Drone.. I have got around 70 meter range using my Samsung mobile acting as WiFi Hotspot and remote controller.

Mpu6050

MPU6050 IMU, a low-cost device that contains both a gyroscope and accelerometer. We will use the MPU-6050 with an Esp8266 module to build an Drone. Learn more About MPU-6050 and Arduino.

Coreless Motor

Coreless Motor are Mini motors used in Quadcopter and Drones, These motor are coreless it mean they do not have metal core in the rotor, Coreless motors can achieve higher RPM with less load. These motors are suitable for micro drones, quadcopters or Mini projects.

Propellers

There’s no challenge that without drone propellers,  The purpose of your propeller is to generate thrust and torque to keep your drone flying.

Schematic for Esp8266 Drone Flight Controller

Nodemcu esp8266 drone
ESP12e (ESP8266) Based receiver control module Schematic:

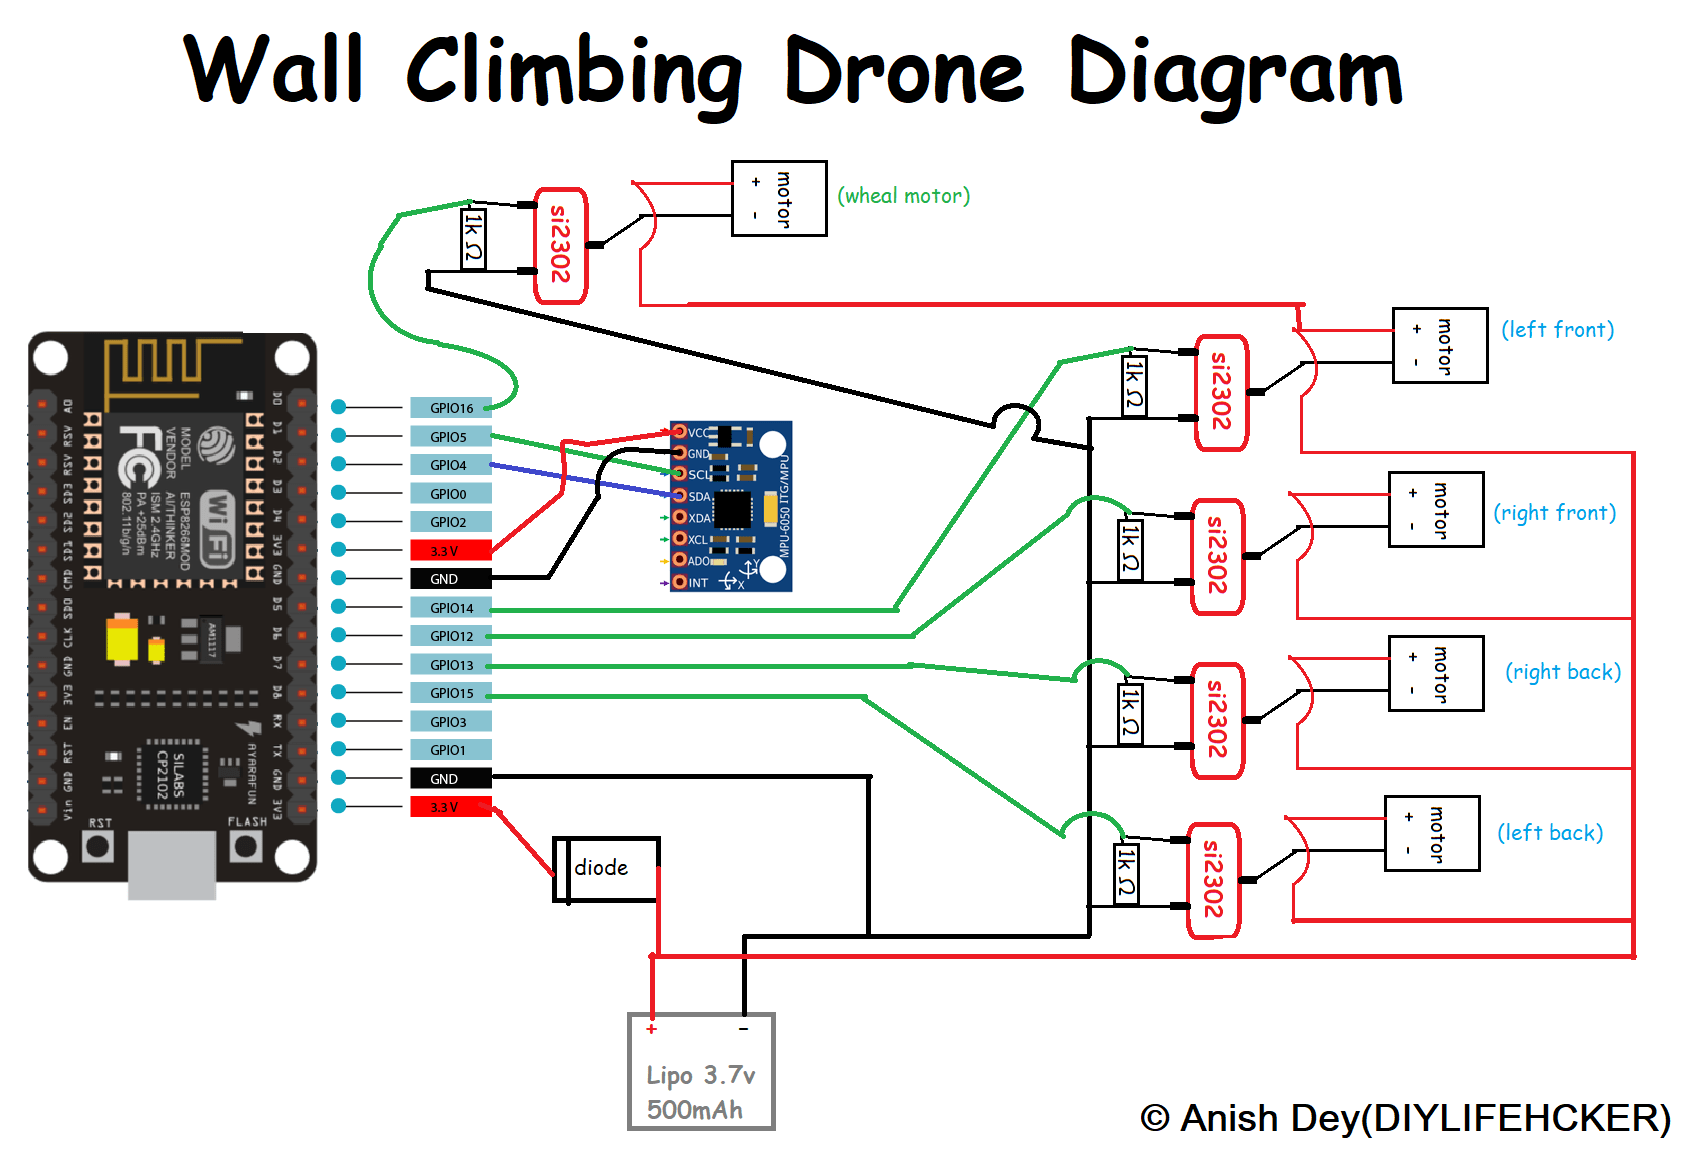
Make the Circuit : Make the circuit by following the schematic diagram given in the above picture.

I have already explained the connection details of each component

Nodemcu esp8266 drone

Build Frame

Frame: The frame provides the structure and rigidity and it’s where all the components will be mounted onto. Chose wooden pencils then i gave it shape of your quadcopter.

Assembling the frame and mounting the ESP8266 flight controller, The first thing we need to do is assemble the frame. i used pencil for fram if you have 3d printer then you can print a good frame.

Software for Esp8266 Drone

Using Arduino IDE: If you want to edit (i.e. SSID and password of WiFi network – Android Hotspot in this case) than this is best method to follow.

  1. Install Arduino IDE
  2. Install ESP8266 Boards
  3. Install ESP8266WiFi.h library
  4. Copy code and put your own wifi SSID and password in code
#include<Wire.h>
#include <ESP8266WiFi.h>
#include <WiFiUdp.h>
WiFiUDP UDP;
char packet[4];
//IPAddress local_IP(192, 168, 203, 158);
//IPAddress gateway(192, 168, 1, 158);
//IPAddress subnet(255, 255, 0, 0);
//_________________________________________//
int ESCout_1 ,ESCout_2 ,ESCout_3 ,ESCout_4;
int input_PITCH = 50;
int input_ROLL = 50;
int input_YAW = 50;
volatile int input_THROTTLE = 0;
int Mode = 0;
boolean wall_car_init = false;
boolean set_motor_const_speed = false;
int8_t target_axis=0;
int8_t target_dirr=0;
boolean wheal_state = false;
uint8_t pwm_stops;
int arr[] = {20,10,20,10};
volatile int order[] = {0,0,0,0}; //volatile key
int temp_arr[] = {0,0,0,0};
int pulldown_time_temp[] = {0,0,0,0,0};
int pulldown_time[] = {0,0,0,0,0};
volatile int pulldown_time_temp_loop[] = {0,0,0,0,0}; //volatile key
uint8_t pin[] = {14,12,13,15};
int i,j,temp_i,temp;
boolean orderState1,orderState2,orderState3,orderState4,Timer_Init;
int16_t gyro_x, gyro_y, gyro_z, acc_x, acc_y, acc_z, temperature, acc_total_vector;
float angle_pitch, angle_roll,angle_yaw,prev_roll,prev_pitch,prev_yaw;
boolean set_gyro_angles;
float angle_roll_acc, angle_pitch_acc;
float angle_pitch_output, angle_roll_output, angle_yaw_output;
long Time, timePrev;
float elapsedTime,P_factor;
float acceleration_x,acceleration_y,acceleration_z;
long gyro_x_cal, gyro_y_cal, gyro_z_cal;
float pitch_PID,roll_PID,yaw_PID;
float roll_error, roll_previous_error, pitch_error, pitch_previous_error, yaw_error, yaw_previous_error;
float roll_pid_p, roll_pid_d, roll_pid_i, pitch_pid_p, pitch_pid_i, pitch_pid_d, yaw_pid_p, yaw_pid_i, yaw_pid_d;
float roll_desired_angle, pitch_desired_angle, yaw_desired_angle;
double twoX_kp=5; //5
double twoX_ki=0.003; //0.003
double twoX_kd=1.4; //1.4
double yaw_kp=8; //5
double yaw_ki=0; //0.005
double yaw_kd=4; //2.8
void ICACHE_RAM_ATTR PWM_callback() {
switch (pwm_stops){
case 0:
pulldown_time_temp[0] = pulldown_time_temp_loop[0];
pulldown_time_temp[1] = pulldown_time_temp_loop[1];
pulldown_time_temp[2] = pulldown_time_temp_loop[2];
pulldown_time_temp[3] = pulldown_time_temp_loop[3];
pulldown_time_temp[4] = pulldown_time_temp_loop[4];
pwm_stops = 1;
if(input_THROTTLE!=0){GPOS = (1 << 14);GPOS = (1 << 12);GPOS = (1 << 15);GPOS = (1 << 13);}
timer1_write(80*pulldown_time_temp[0]);
break;
case 1:
pwm_stops = 2;
GPOC = (1 << pin[order[0]]);
timer1_write(80*pulldown_time_temp[1]);
break;
case 2:
pwm_stops = 3;
GPOC = (1 << pin[order[1]]);
timer1_write(80*pulldown_time_temp[2]);
break;
case 3:
pwm_stops = 4;
GPOC = (1 << pin[order[2]]);
timer1_write(80*pulldown_time_temp[3]);
break;
case 4:
pwm_stops = 0;
GPOC = (1 << pin[order[3]]);
timer1_write(80*pulldown_time_temp[4]);
break;
}
}
void setup() {
pinMode(D5,OUTPUT);pinMode(D6,OUTPUT);pinMode(D7,OUTPUT);pinMode(D8,OUTPUT);pinMode(D0,OUTPUT);
GPOC = (1 << 14);GPOC = (1 << 12);GPOC = (1 << 13);GPOC = (1 << 15);
digitalWrite(D0,LOW);
Serial.begin(115200);
WiFi.mode(WIFI_STA);
WiFi.begin("Redmi_R", "deywifi3210");
while (WiFi.status() != WL_CONNECTED){ delay(500);}
Serial.println(WiFi.localIP());
UDP.begin(9999);
delay(6000);
//____________________________________________________________________//
Wire.begin();
Wire.setClock(400000);
Wire.beginTransmission(0x68);
Wire.write(0x6B);
Wire.write(0x00);
Wire.endTransmission();
Wire.beginTransmission(0x68);
Wire.write(0x1C); //accel
Wire.write(0x08); //+-4g
Wire.endTransmission();
Wire.beginTransmission(0x68);
Wire.write(0x1B); //gyro
Wire.write(0x18); //2000dps
Wire.endTransmission();
Wire.beginTransmission(0x68);
Wire.write(0x1A);
Wire.write(0x03);
Wire.endTransmission();
//____________________________________________________________________//
for (int cal_int = 0; cal_int < 4000 ; cal_int ++){
if(cal_int % 125 == 0)Serial.print(".");
Wire.beginTransmission(0x68);
Wire.write(0x3B);
Wire.endTransmission();
Wire.requestFrom(0x68,14);
while(Wire.available() < 14);
acc_y = Wire.read()<<8|Wire.read();
acc_x = Wire.read()<<8|Wire.read();
acc_z = Wire.read()<<8|Wire.read();
temperature = Wire.read()<<8|Wire.read();
gyro_y = Wire.read()<<8|Wire.read();
gyro_x = Wire.read()<<8|Wire.read();
gyro_z = Wire.read()<<8|Wire.read();
gyro_x_cal += gyro_x;
gyro_y_cal += gyro_y;
gyro_z_cal += gyro_z;
delayMicroseconds(100);
}
gyro_x_cal /= 4000;
gyro_y_cal /= 4000;
gyro_z_cal /= 4000;
timer1_attachInterrupt(PWM_callback);
timer1_enable(TIM_DIV1, TIM_EDGE, TIM_SINGLE);
}
void loop() {
//--------------------------------MPU6050----------------------------//
timePrev = Time;
Time = micros();
elapsedTime = (float)(Time - timePrev) / (float)1000000;
Wire.beginTransmission(0x68);
Wire.write(0x3B);
Wire.endTransmission();
Wire.requestFrom(0x68,14);
while(Wire.available() < 14);
acc_y = Wire.read()<<8|Wire.read();
acc_x = Wire.read()<<8|Wire.read();
acc_z = Wire.read()<<8|Wire.read();
temperature = Wire.read()<<8|Wire.read();
gyro_y = Wire.read()<<8|Wire.read();
gyro_x = Wire.read()<<8|Wire.read();
gyro_z = Wire.read()<<8|Wire.read();
gyro_x -= gyro_x_cal;
gyro_y -= gyro_y_cal;
gyro_z -= gyro_z_cal;
acceleration_x = gyro_x * (-0.0610687023);
acceleration_y = gyro_y * (-0.0610687023);
acceleration_z = gyro_z * (-0.0610687023);
angle_pitch += acceleration_x * elapsedTime;
angle_roll += acceleration_y * elapsedTime;
angle_yaw += acceleration_z * elapsedTime;
if(angle_yaw >= 180.00){angle_yaw-=360;}
else if(angle_yaw < -180.00){angle_yaw+=360;}
angle_roll_acc = atan(acc_x/sqrt(acc_y *acc_y + acc_z*acc_z))*(-57.296);
angle_pitch_acc = atan(acc_y/sqrt(acc_x*acc_x + acc_z*acc_z))*57.296;
angle_pitch_acc -= 4;
angle_roll_acc += 9;
if(set_gyro_angles){
angle_pitch = angle_pitch * 0.9996 + angle_pitch_acc * 0.0004;
angle_roll = angle_roll * 0.9996 + angle_roll_acc * 0.0004;
}
else{
angle_pitch = angle_pitch_acc;
angle_roll = angle_roll_acc;
set_gyro_angles = true;
}
angle_pitch_output = angle_pitch_output * 0.9 + angle_pitch * 0.1;
angle_roll_output = angle_roll_output * 0.9 + angle_roll * 0.1;
angle_yaw_output = angle_yaw_output * 0.9 + angle_yaw * 0.1;
//--------------------------PID_Calculation--------------------------//
if(wall_car_init==false){
roll_desired_angle = 3*(input_ROLL - 50)/10.0;
pitch_desired_angle = 3*(input_PITCH - 50)/10.0;
}
P_factor = 0.001286376*input_THROTTLE + 0.616932;
roll_error = angle_roll_output - roll_desired_angle;
pitch_error = angle_pitch_output - pitch_desired_angle;
yaw_error = angle_yaw_output;
roll_pid_p = P_factor*twoX_kp*roll_error;
pitch_pid_p = P_factor*twoX_kp*pitch_error;
yaw_pid_p = yaw_kp*yaw_error;
roll_pid_i += twoX_ki*roll_error;
pitch_pid_i += twoX_ki*pitch_error;
yaw_pid_i += yaw_ki*yaw_error;
roll_pid_d = twoX_kd*acceleration_y;
pitch_pid_d = twoX_kd*acceleration_x;
yaw_pid_d = yaw_kd*acceleration_z;
if(roll_pid_i > 0 && roll_error < 0){roll_pid_i=0;}
else if(roll_pid_i < 0 && roll_error > 0){roll_pid_i=0;}
if(pitch_pid_i > 0 && pitch_error < 0){pitch_pid_i=0;}
else if(pitch_pid_i < 0 && pitch_error > 0){pitch_pid_i=0;}
if(yaw_pid_i > 0 && yaw_error < 0){yaw_pid_i=0;}
else if(yaw_pid_i < 0 && yaw_error > 0){yaw_pid_i=0;}
roll_PID = roll_pid_p + roll_pid_i + roll_pid_d;
pitch_PID = pitch_pid_p + pitch_pid_i + pitch_pid_d;
yaw_PID = yaw_pid_p + yaw_pid_i + yaw_pid_d;
ESCout_1 = input_THROTTLE + pitch_PID - roll_PID + yaw_PID;
ESCout_2 = input_THROTTLE + pitch_PID + roll_PID - yaw_PID;
ESCout_3 = input_THROTTLE - pitch_PID + roll_PID + yaw_PID;
ESCout_4 = input_THROTTLE - pitch_PID - roll_PID - yaw_PID;
//------------------------- CarMode -----------------------------//
if(Mode==1 && (abs(input_ROLL-50)>30 || abs(input_PITCH-50)>30)){
wall_car_init = true;
if(input_ROLL > 30){target_axis = 1; target_dirr = 1;}
else if(input_ROLL < -30){target_axis = 1; target_dirr = -1;}
else if(input_PITCH > 30){target_axis = 2; target_dirr = 1;}
else if(input_PITCH < -30){target_axis = 2; target_dirr = -1;}
}
else if(Mode==0){wall_car_init=false;set_motor_const_speed=false;}
if(wall_car_init==true){
if(target_axis=1){roll_desired_angle = 90*target_dirr;}
else if(target_axis=2){pitch_desired_angle = 90*target_dirr;}
if((abs(acceleration_x)<15 && abs(acceleration_y)<15) && (abs(angle_roll_output)>45 || abs(angle_pitch_output)>45)){set_motor_const_speed = true;}
if(set_motor_const_speed==true){
ESCout_1 = 1100; ESCout_2 = 1103; ESCout_3 = 1106; ESCout_4 = 1109;
if(input_ROLL>50 && wheal_state == true){digitalWrite(D0,HIGH);}
}
}
//----------------------------------------------------------------//
if(ESCout_1>1199) ESCout_1=1199;
else if(ESCout_1<1) ESCout_1=1;
if(ESCout_2>1199) ESCout_2=1199;
else if(ESCout_2<1) ESCout_2=1;
if(ESCout_3>1199) ESCout_3=1199;
else if(ESCout_3<1) ESCout_3=1;
if(ESCout_4>1199) ESCout_4=1199;
else if(ESCout_4<1) ESCout_4=1;
//----------------------------- Sorting -------------------------------//
arr[0]=ESCout_1;arr[1]=ESCout_2;arr[2]=ESCout_3;arr[3]=ESCout_4;
temp_arr[0] = arr[0];temp_arr[1] = arr[1];temp_arr[2] = arr[2];temp_arr[3] = arr[3];
for (i = 0; i < 3; i++){
temp_i = i;
for (j = i+1; j < 4; j++)
if (temp_arr[j] < temp_arr[temp_i])
temp_i = j;
temp = temp_arr[temp_i];
temp_arr[temp_i] = temp_arr[i];
temp_arr[i] = temp;
}
pulldown_time[0]=temp_arr[0];
pulldown_time[1]=temp_arr[1]-temp_arr[0];
pulldown_time[2]=temp_arr[2]-temp_arr[1];
pulldown_time[3]=temp_arr[3]-temp_arr[2];
pulldown_time[4]=1200-temp_arr[3];
if(pulldown_time[1]==0){pulldown_time[1]=1;}
if(pulldown_time[2]==0){pulldown_time[2]=1;}
if(pulldown_time[3]==0){pulldown_time[3]=1;}
if(pulldown_time[4]==0){pulldown_time[4]=1;}
pulldown_time_temp_loop[0] = pulldown_time[0];
pulldown_time_temp_loop[1] = pulldown_time[1];
pulldown_time_temp_loop[2] = pulldown_time[2];
pulldown_time_temp_loop[3] = pulldown_time[3];
pulldown_time_temp_loop[4] = pulldown_time[4];
orderState1=false;orderState2=false;orderState3=false;orderState4=false;
for(int k=0; k <4; k++){
if(temp_arr[0] == arr[k] && orderState1 == false){ order[0] = k; orderState1=true;}
else if(temp_arr[1] == arr[k] && orderState2 == false){ order[1] = k; orderState2=true;}
else if(temp_arr[2] == arr[k] && orderState3 == false){ order[2] = k; orderState3=true;}
else if(temp_arr[3] == arr[k] && orderState4 == false){ order[3] = k; orderState4=true;}
}
//----------------------------- WiFi ----------------------------------//
int packetSize = UDP.parsePacket();
if (packetSize) {
int len = UDP.read(packet, 4);
if(len>0){packet[len] = '\0';}
input_ROLL = int(packet[0]);
input_PITCH = int(packet[1]);
input_THROTTLE = int(packet[2])*24;
Mode = int(packet[3]);
}
if(input_THROTTLE == 0){
angle_yaw_output=0;angle_yaw=0;yaw_PID=0;
yaw_pid_p=0;yaw_pid_i=0;yaw_pid_d=0;twoX_ki=0;
}
//-------------------------------------------------------------------//
//Serial.print(input_ROLL);Serial.print(" ");
//Serial.print(input_PITCH);Serial.print(" ");
//Serial.print(input_THROTTLE);Serial.print(" ");
//Serial.print(angle_roll_output,0);Serial.print(" ");
//Serial.print(angle_pitch_output,0);//Serial.print(" ");
//Serial.println(input_THROTTLE);
if(wheal_state == false){digitalWrite(D0,LOW);}
if(Timer_Init == false){
timer1_write(80);
Timer_Init = true;
}
wheal_state = !wheal_state;
while(Time - timePrev <1200);
}
    • Setup Arduino IDE for ESP8266 by following this excellent Instructable.
    • Download esp8266drone.ino from attachment of this step.
    • Open Arduino IDE and copy code from esp8266drone.ino
    •  and paste it in to Arduino IDE.
    • Edit SSID and Password of your network in the code by editing following two lines.
WiFi.begin("Diyprojectslab", "romeooo"); //ssid or pass
  • Connect ESP8266 to your computer
  • Hit Upload button from Arduino IDE a.
  • If all goes fine than you can See blue LED on ESP8266 start flashing at every one second.

Android App Setup and Testing Esp8266 Drone

Android App Installation:

You just need to download app-debug.apk file attached with this step to your smartphone.

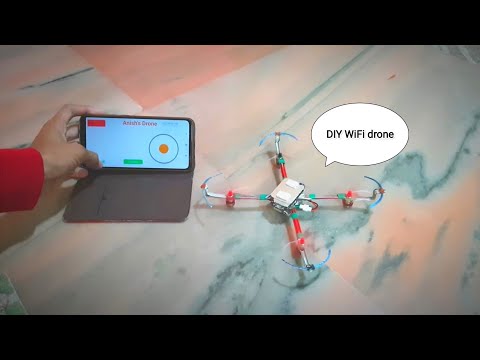
Installation of Android Application for WiFi plane to your smartphone is quite easy and its step by step in this video.

Once Android App is up and running on your smart phone, refer above video to know how App works and various cool features of the app..

It’s Time to Fly

Ready to fly?…

  • GET IN TO THE FIELD

A Wall Climbing based on NodeMCU Flight Controller an Android App control . Full details and explanation video.

Video Explaination : 

I am sure, You gonna fall in love with it…

ENJOY…………….HAPPY MAKING……………HAPPY FLYING……………….

Your Questions/Comments/Suggestions are welcome…

Hope you Liked and Enjoyed.

Cheers,

Check our previous Drone Projects


No comments

Featured Post

Proyek Sistem Parkir Mobil otomatis Menggunakan Arduino

S kenario saat ini, masalah yang terkait dengan parkir kendaraan semakin meningkat dari hari ke hari. Pada artikel kali ini kita akan membua...